The last few years I’ve been working on imporving my CW skills. A couple of years ago I started working on pairing down the keyer code for the Arduino. The result was a simple Iambic keyer sketch. I think it would make a great starting project for ham looking to work with the Arduino. So many people are introduced to the Arduino programming with the blink program. Which is a simple program to blink the arduino board’s LED. The Tiny Keyer is a simple sketch which only cost a few bucks to build might be a great starting project for Ham Radio Operaters , Morse Code enthusiast or club activity .
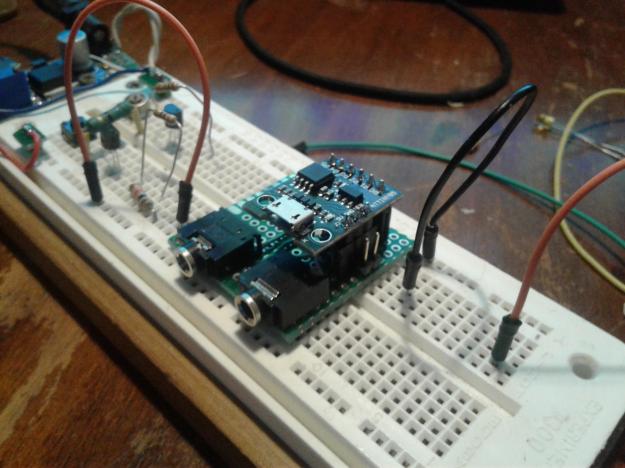
I recently picked up an Arduino ATTiny 85 Kickstarter board by Digispark, ebay price was $1.36. The Kickstarter has a ATTINY85 chip with all the nessacary hardware and usb interface built on a tiny board. With it tiny size and low cost it seem like the perfect board to use with my Tiny Keyer sketch.
Using the Arduino IDE I installed the supporting files for the ATTiny 85. Using the following process.
First open Arduino IDE , next go to File/preferences and then in additional board manager URLs paste the following url for Digispark.
Now go to Tools/board:/boards manager and download the Digispark boards. Using search box, at the top, type a keyword like “digispark” or “digistrump”. Next click on install and the digispark libraries will be added the IDE.
Now go back to Tools/Board: and clik on Digispark Default 16.5mhz. Next in Tools/Programmer select: micronucleus
First Load the Tiny Keyer Sketch and click on Verify button at the top of the IDE,(check button). With the Digispark board unplugeed for the usb connector hit upload button (right arrow) and you’ll get a message in the black box at bottom of arduino IDE to connect the device within 60 seconds. Plug in the Digispark to usb port and the Tiny keyer sketch is loaded. After which if everything works you’ll see a second message micronucleus done thank you. The code was uploaded and your ready start using your Tiny Keyer.
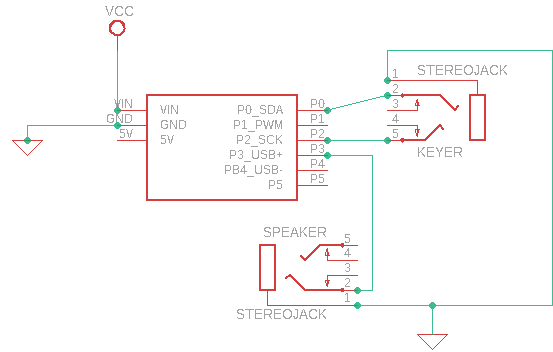
TheTiny keyer connects to Dit pin0 and, Dah pin2 paddles plus a ground. There’s a Speaker pin3 for operater feedback and a Key circuit pin1 for keying rigs lacking an Iambic keyer input. With a footprint this small the Tiny keyer could be slipped into an older rig or added to a mobile QRP setup. Some embellishments might include a message playback for the tiny keyer. But my purpose was to buid the Tiny Keyer project as a starting point for Morse code enthusiast.
Attiny85 Keyer Sketch: ATtiny85 Keyer
